


How to finish miniature bases (32 mm, 60 mm)?
Sometimes you might finish painting your model and be pleased with the result but also concerned. You begin to wonder how to complete the miniature base so it could match the level of the painting. Leaving it clear undoubtedly would be a missed opportunity. Let us show how we usually finish the miniature model bases. For example, we’ll guide you through the finishing base tutorial for 32 and 60 mm sizes in Warhammer 40k style.
What you'll need
Your needs depend on how you would like to display your miniature. If the model’s main task is to grace your shelf with its presence, then you’ll have much more possibilities than in the case when the model is intended to play. That’s because many features, like shape and size, are decided by the rules of a particular wargame.
One crucial thing that might sound obvious is that you must have a miniature base to finish it. The instances may occur that you’ll have a painted miniature, but you won’t have a suitable base for it. That’s why in Kromlech, we have a wide range of various bases.
Base types
The cafeteria of bases is enormous. We can categorize them based (pun intended) on many attributes, like shape, size, or the type of material. Differing the bases by shape, we can highlight four significant categories - round, square, oval, and rectangle. The square and rectangle ones are a common choice regarding Warhammer Fantasy miniature bases, but not Warhammer 40k.

Consistency is usually a good idea - when deciding on Rocky Outcrop bases with some Static Grass, try to make them for all units in your army
In the case of size, the range of miniature bases is more comprehensive. We can find the 25, 32, 40, 50, 60, and 80 mm bases, and so on (both round and square). Regarding the type of material, the most popular are plastic bases, but the HDF ones aren’t much behind them. Acrylic bases may not be as common as the other two, but they aren’t very rare.
Priming and painting
The step of priming and painting your base is the least complicated of the entire process. If you ever wondered “how to paint a miniature base for Warhammer 40k,” worry not. It wouldn’t be complex if you painted the model already (which is the most common practice probably but finishing the base before painting a model is also an option). You need to pick a color (usually brown, green, or gray) and paint the base (including the rants) with a paintbrush. Some cases allow you to skip this (and, frankly, any other) step. It happens when you decide to go with clear acrylic bases - it’s a practical solution that allows you to save time, but it’s not very satisfying and doesn’t allow you to show creativity.
On the other hand, priming and painting can be the most vital (or even the only) step to finishing a miniature’s base. That usually occurs when you choose either our resin bases or base toppers. The first ones are already prepared bases, available in different themes, for example, forest or junkyard, waiting for you to paint them. The second ones are unique slots on bases that give you a particular pattern that you paint and have a good-looking set of matching-one-another bases. Both come in various sizes (including 32 and 60 mm), but in our offer, you’ll only find those in round and oval shapes. After all, these are the shapes you’ll probably be seeking for your Warhammer 40k models. Nonetheless, if you choose them, remember that it’s good to prime them before painting.
Details added
If you want to test your modeling skills, you should prepare the base entirely yourself - that solution allows you to make it as unique as you can imagine. Especially if you have a bigger base, such as 60 mm - the bigger it is, the more options you have.
Thanks to our modeling and basing offer, your base could be almost any-themed. It’s up to you if you add some basing sand, make realistic rocks from cork, or cover the space with static grass. To make the forest-styled base, we recommend using a bit of clump foliage, which makes the difference and adds realism to your creation.

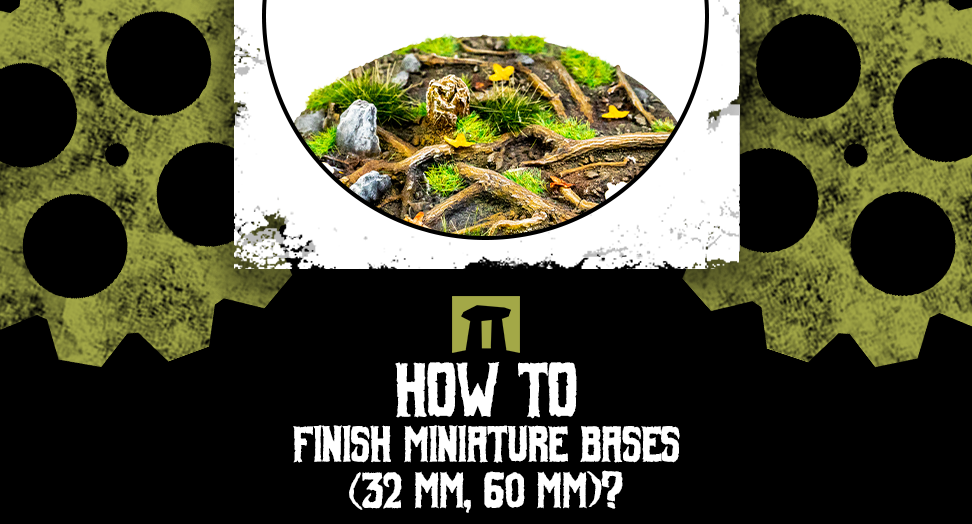
Base Toppers (such as those in the picture) are the perfect ones to speed up the basing step when making an army
Additionally, it’s good to remember that even the already prepared bases (like those resin) could benefit from a bit of conversion. Most of the features we listed above could also be used to upgrade the scenic base - making it even more complex! But be careful not to add too much. In the case of a 32 mm base or similar, it’s hard to include everything you wish - usually, one bigger rock is enough if you still want to place your model there.
If you can’t decide whether you would like to have forest or rocky-style bases, consider differing them among a unit - one model may stand on a rock, while the other can kneel in high grass. Using your painting skills and creativity, you can still keep all in the same theme - so the bases could match one another.
Sealing
At last, when you finally finish the bases for your models, you should consider some protection, so your work wouldn’t be in vain. The common practice is to use the spray varnish - not only for the base alone but also for the whole model. Additionally, remember about some safe boxes to keep your models there to minimize the risk of damaging the composition of their bases.
Mounting on a display stand
One final thing is the possibility of mounting a based figure on a display stand. While the idea sounds simple, the execution could require some modeling skills. A perfect solution when mounting a figure on a display stand (acknowledging that we don’t want to mount it for good) is using small magnets. If you manage to drill through the base of a miniature (carefully) to glue a magnet there and install another somewhere atop the display stand, you’ll be able to mount and dismount the model safely as often as you wish.